Want to encourage repeat purchases?
Customize the default WooCommerce thank you page and run upsell offers.
This post shows how you can customize the thank you page using code and plugins and how you can set up smart automated offers to boost your revenue.
Why customize WooCommerce thank you page?
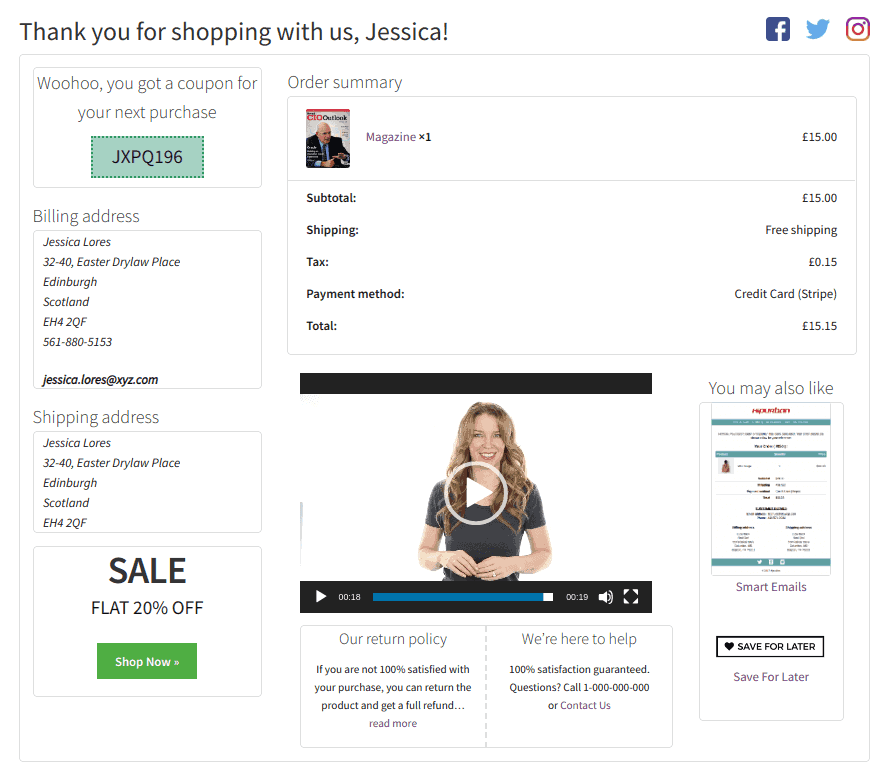
When anyone makes a purchase on any WooCommerce store, they are redirected to the default order received page. It says, ‘Thank You, Your order has been received’, along with the summary details.
That’s a dead-end for customers. You can’t upsell products, build a list or add some offers.
But all that changes if you customize the thank you page, turning it into a powerful marketing tool.
You can build a list, show coupons, promote related products, collect feedback, show videos and much more.
Since customers have already made a purchase, the trust is more. So conversions on the thank you page are even higher.
How to customize the WooCommerce thank you page?
There are two ways to customize the thank you page:
Using code
- Creating a redirect
- Using filters
- Overwriting template file
Here’s a detailed blog on customizing thank you page with code.
Using a plugin
There are quite a good number of plugins available if coding is not your cup of tea.
You can try Custom Thank You Page for WooCommerce plugin.
Some powerful plugin features:
- Set a custom thank you page for all products
- Set a custom thank you page per product
- Works with Astra, Storefront, OceanWP, and other popular themes that support WooCommerce.
- Redirect users after checkout/payment to affiliate links or any third-party link or resources.
- No coding required
How to set up automated upsells, order bumps, cross-sell offers on the thank you page?
With the thank you page customized, let’s see how to automatically run offers on the thank you page.
Btw…this is different from running one-click upsells in WooCommerce that also shows upsell offers on the thank you page.
Check the blog on how to set up WooCommerce one-click upsells.
Now, creating an offer involves designing, copywriting, coupon creation, targeting rules and other tasks. Each task is time-consuming, expensive and has no guarantee of conversions.
So what if everything is done for you and can encourage more customers to purchase again?
Offermative is what you need.
Simply select from readymade upsell offers, run them on the thank you page and watch your sales soar.
Follow these steps:
- Install and activate the Offermative plugin.
- Next, log in using your email and password (automatically sent to your email).
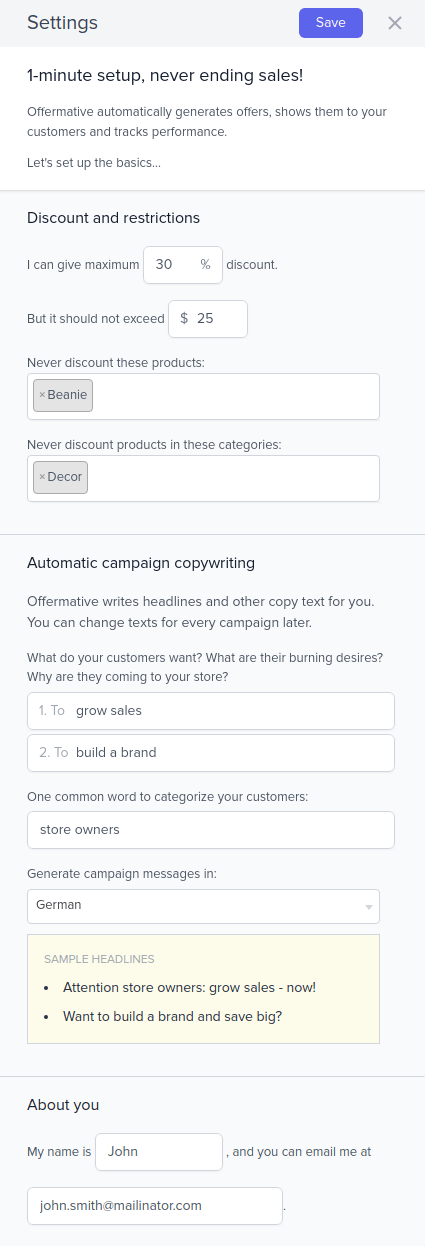
- Enter some requirements under the Settings screen as shown and save them. More about it here. Offermative will take this data to prepare the offer copy based on your target customers.
- You’ll see the Generate Offer Campaigns button. Click on it. You’ll see two options:
- Let Offermative decide option
- Other offer types (you can choose multiple options)
- Click on the Generate button. You’ll have ten campaigns generated in one go. Click the same button to generate more campaigns.
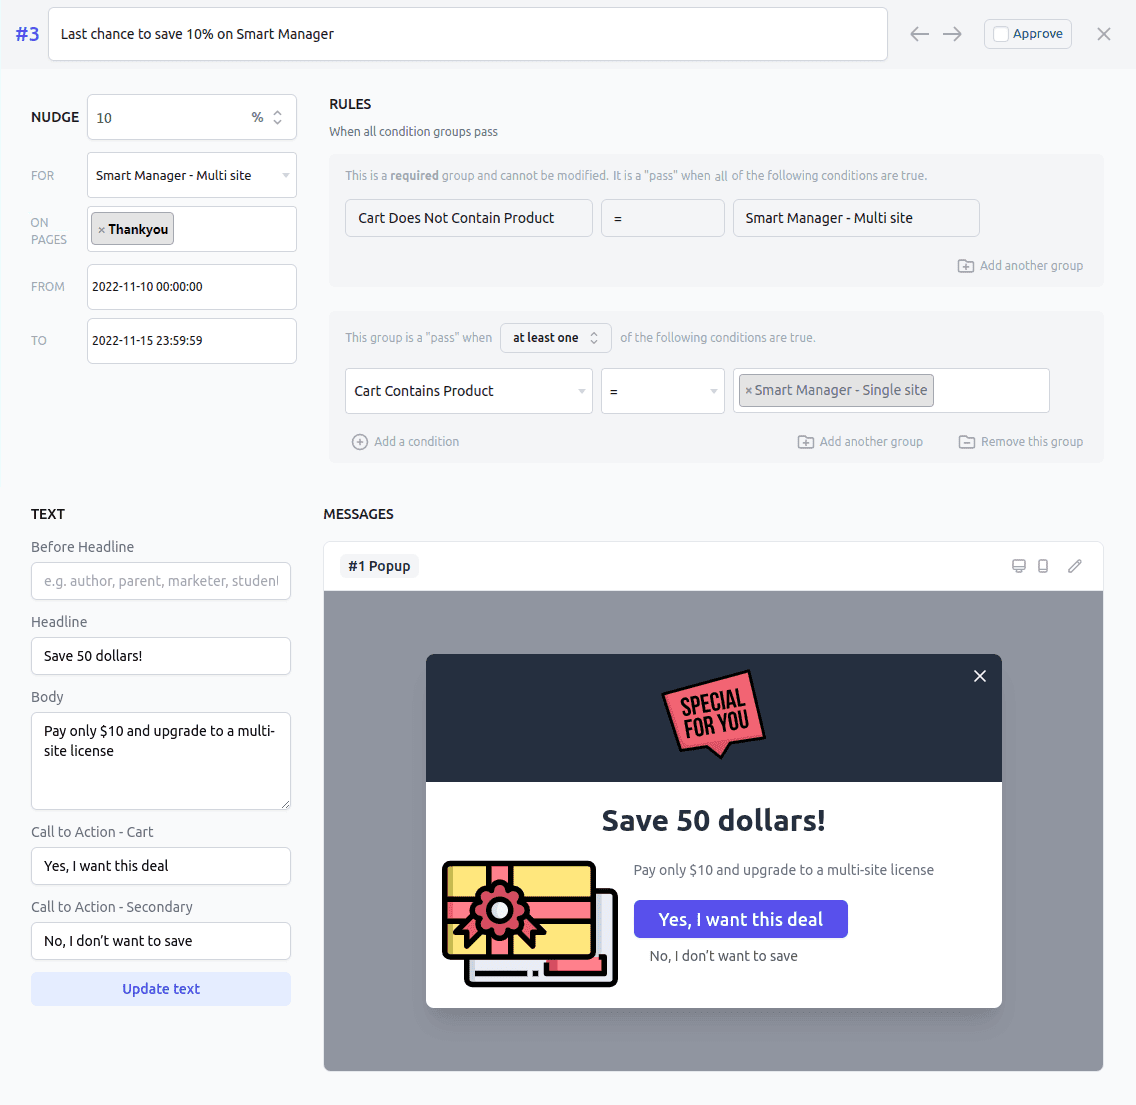
- Use the arrows to navigate through different campaigns. Check the Approve box if you like that campaign. Rename the campaign title on the top.
- On the top-left of the campaign, enter the discount if you wish to provide any.
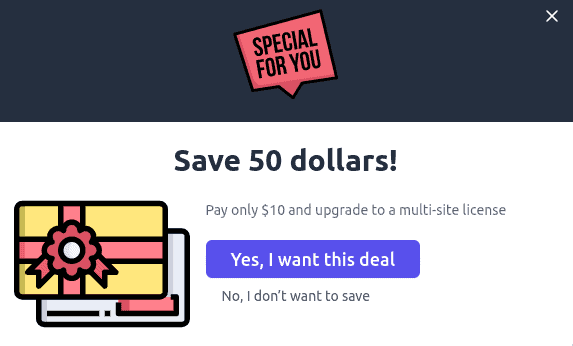
- Under FOR, enter the product you would like to upsell. Here, we will upsell ‘Smart Manager multi-site license’ when the user purchases ‘Smart Manager single-site license’. Offermative also works with WooCommerce Subscriptions and other product types.
- Under ON PAGES, select the
Thank You page (default)or the customized thank you page. - Choose the date range and time the offer will be shown to the visitors.
- Under RULES, set the rules as follows:
Cart Does Not Contain Product = Smart Manager - Multi-sitewhich is obvious.Cart Contains Product = Smart Manager - Single siteon which you want to show the upsell offer.
- You can also set up multiple rules based on cart total, customer purchase history, customer LTV to show the upsell offer. Edit the pre-generated rules for the campaigns if required.
- Under the MESSAGES section, select how you want to show the upsell offer – header-footer bar, messenger, popup. We select the popup message here.
- The Pencil icon can be used to customize each message type for colors, fonts, buttons and other CSS elements.
- You can also edit the offer copy and CTA text.
- Publish your campaign.
That’s it. Your WooCommerce upsell offer on the thank you page (or custom thank you page) is ready.
You can set up and run unique upsell offers on each custom thank you page per product to boost your average order value.
Also, track your upsell offer performance from the Offermative dashboard to see how much money it makes for you.
Based on the performance, you can extend, pause, make some offer changes and resume it again.
Winding up
Do not neglect your thank you page. It’s a goldmine. Customize it to run powerful offers on it to nudge customers to buy again.
Offermative, is like a WooCommerce sales booster, allowing you to run targeted promotions on hundreds of products and pages within minutes.
It’s an investment for an exponential RoI.