You may have heard about CartFlows. It’s a popular WordPress sales funnel tool or Woo funnels (WooCommerce funnels) tool and also a ClickFunnels alternative. But what is Offermative? And why it is seen as a CartFlows alternative?
Well, this is what users in the WooCommerce and WordPress space get confused about. So let us clear the air.
Most important thing, this is not an apples to apples comparison. However, you would find some overlapping features.
With sales funnel being indispensable for your business success, you can’t grow sales without running offers on your store. CartFlows and Offermative, both make it simple to grow sales with their automation features. Something which was just an idea on paper years ago, is now a reality.
So, let us do an unbiased comparison and help you decide which tool you need to use to enhance your sales funnel – Offermative, CartFlows or both.
The core purpose
While both CartFlows and Offermative are Woo funnels solutions, their vision is different.
What is CartFlows?
CartFlows is a sales funnel builder plugin for WordPress. You can generate leads, run offers and optimize checkout. It works with WooCommerce as well.
CartFlows comes from the team at WPAstra and Adam Crafter. They are known for some cool products.
What is Offermative?
Offermative is an AI-based WooCommerce plugin that automates your entire offer creation process.
Which products to promote, what should be the offer design, what should be the offer copy…it automates 15+ tasks for you. Woo expert, Chris Lema lists down all these 15+ tasks in this post.
Select from readymade offers, make tweaks, target them in the sales funnel and see your sales soar.
Offermative is brought to you by StoreApps, the official WooCommerce extensions developers. It’s the same team that brought you Smart Coupons, Affiliate for WooCommerce, Smart Manager and 20+ other extensions.
CartFlows features, setup…what do you get?
We begin with what CartFlows have on their plate.
CartFlows features
Lead generation
Build high converting landing pages using the CartFlows Optin feature to grow your email list.
A/B split testing
Identify the best version of your page that generates more conversions for you. You can test everything on the page.
Conversion optimized templates
Choose from a wide variety of high converting templates to make your audience go gaga over it. You can add a multi-step funnel or you can build your own funnel using the templates.
One-click upsells
Target a series of additional offers after order completion. Customers already have paid you. No need to repeat the checkout. Offers get accepted in one-click.
One-click order bumps
Cross-sell offers on the checkout pages to sell complimentary products or low-priced items like services or extended warranties.
Checkout layout
Optimize your checkout by eliminating what’s not required. You can also add guarantees and reassurances that can boost conversions.
Checkout custom fields
Add custom fields and hide what you don’t require.
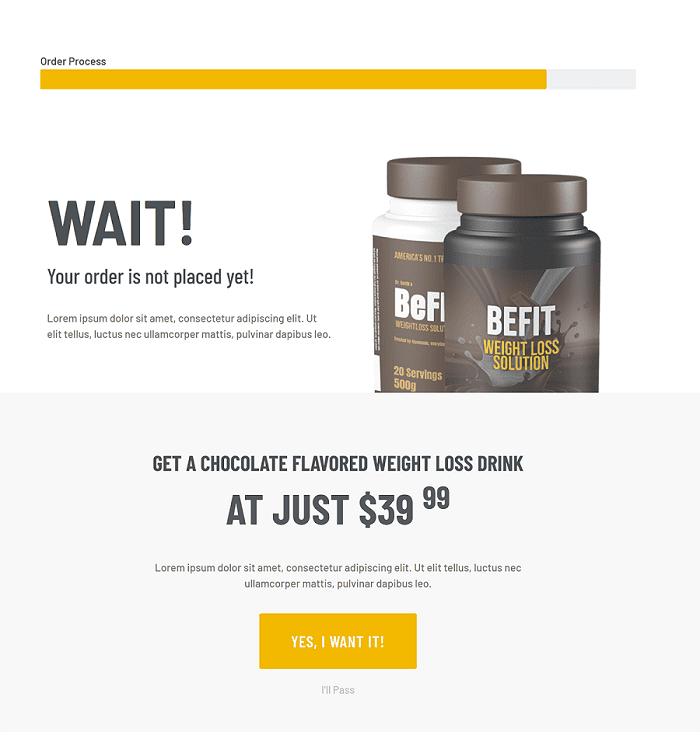
Pre-checkout offer
An offer is displayed on the checkout page when the user clicks on the ‘Place Order’ button.
Global checkout
Create the perfect checkout page and assign it to be the default checkout template.
Insights
Gain in-depth analytics – total visits, conversions, conversion rate, revenue during each step of the funnel, gross sales, revenue from order bumps.
Cart abandonment
If a buyer doesn’t complete the checkout, their info is passed to your CRM to trigger an email.
Analytics & tracking
Identify your best and poor performing offers to improve conversions.
Dynamic linking
Add or rearrange your sales funnel steps with CartFlows’ dynamic linking engine.
CartFlows installation
CartFlows comes in both a free version and a premium add-on, and you need to install both to use it.
As you do for any WordPress plugin, go to Plugins > Add New and search for CartFlows. You’ll see Funnel Builder By CartFlows. Install it.
Then, head to the CartFlows website to purchase the premium version and upload the ZIP file to install it. The premium version is priced for $239 for a year.
CartFlows setup
Creating your Flow / Funnel with CartFlows
CartFlows term funnels as flows. Once you install and activate both the plugins, you can start creating your flows.
On your WordPress Admin dashboard, click on the CartFlows option and select Add New.
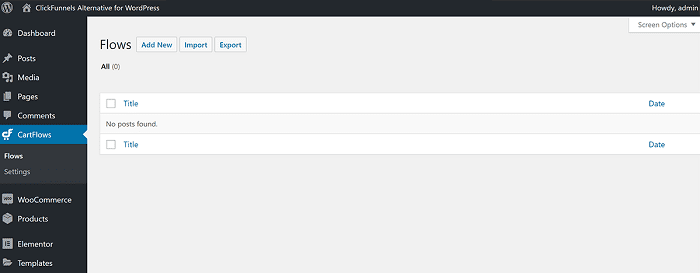
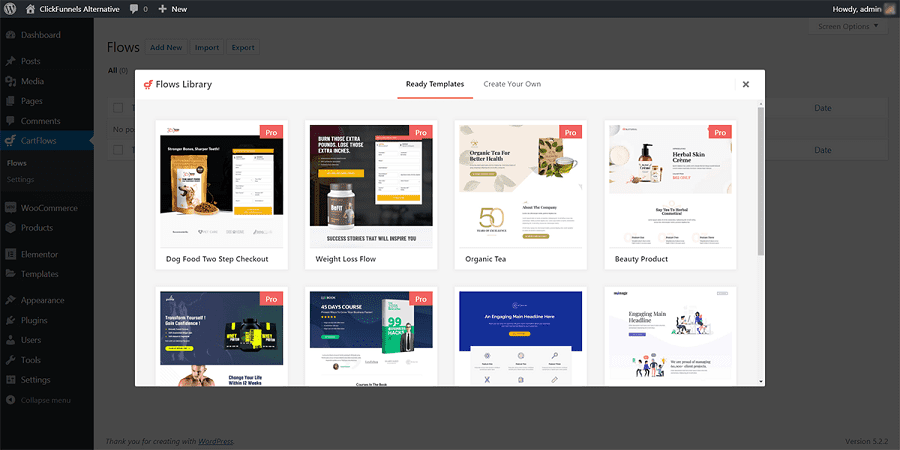
Next, create your own flow from scratch or choose a template from a variety of pre-made flows/funnels.
Creating your own flow may be quite time-consuming and difficult initially. So, better to use the available templates.
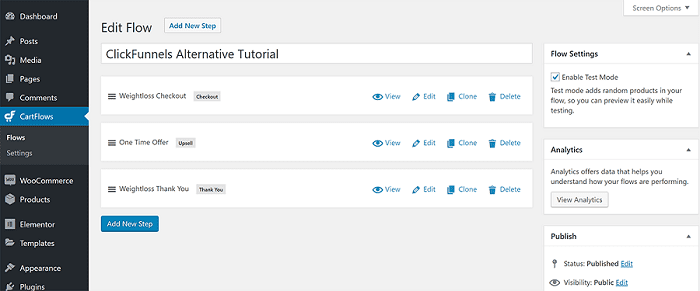
Each template may have a flow with different steps. For example, the ‘Weight Loss Flow’ template flow is built with three separate steps:
- The main checkout page
- A one-time offer upsell
- A thank you page
You can change the funnel’s steps by dragging different content items around.
Adding steps to your flows
If you want to add a new step to your flow/funnel, you just click the Add New Step button.
A popup will open up. Here, you can again choose from pre-made templates or create your own. The templates are divided into five different categories:
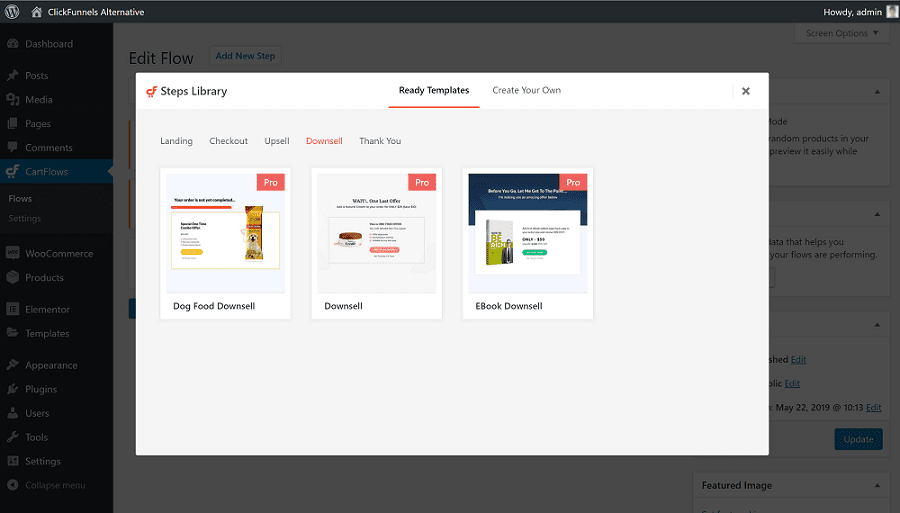
- Landing
- Checkout
- Upsell
- Downsell
- Thank You
Edit individual flow steps
To edit an individual step in your funnel – like the main checkout page or an upsell page – you can click the Edit link for that step.
Here, you have two options to edit your funnel step:
- First option is by clicking the
Edit With Elementorbutton. It will launch the drag-and-drop Elementor interface. You can then customize the design and layout of this step in the funnel. - Second option is by using the
Settings box(e.g. Checkout Layout) to configure other important settings. These can be adding order bumps, what information to collect and more.
Using Elementor
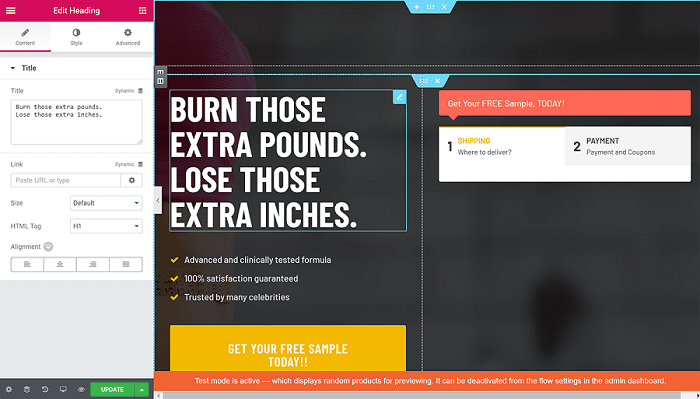
With Elementor, you can:
- Click and type to edit any of the text
- Use drag-and-drop to rearrange the layout
- Add new Elementor widgets to add additional content
However, you won’t be able to customize the actual checkout form.
Using Settings Box
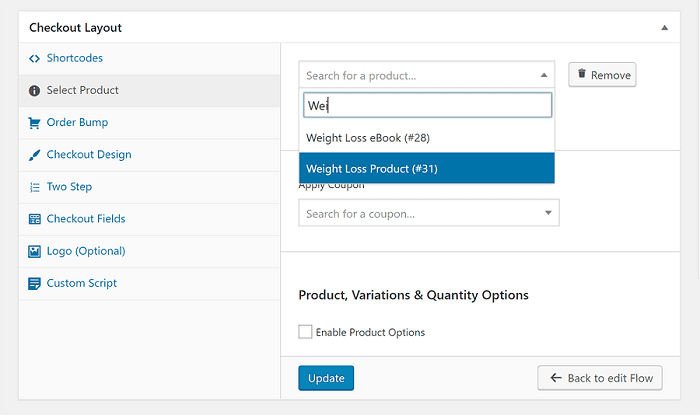
To customize the checkout, use the Checkout Layout box.
First, use the Select Product tab to choose the WooCommerce product that you want to offer as an upsell/downsell. This is one of the products that you created earlier. CartFlows will use that product’s price in the checkout.
If you want to add an order bump, you can use the Order Bump tab. You can show order bump at any of these four positions:
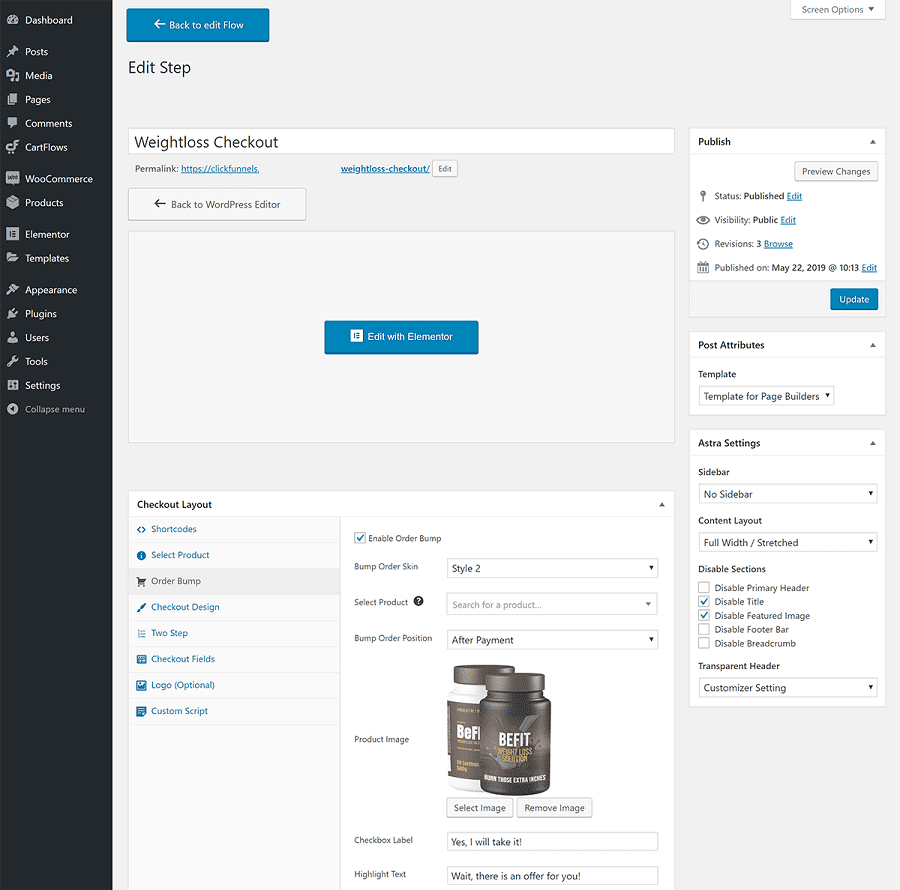
- Before checkout
- After customer details
- After order
- After payment
In the Checkout Design tab, you can choose either a two-step checkout or a multi-column checkout.
In the Checkout Fields tab, choose what information to collect from your customers.
For example, you can turn off the address fields for digital products. Or, you can also use custom fields to collect additional information about your shoppers.
Repeat for other flow steps. Once you finish, complete the same process for other stages in your funnel.
Putting your flow / funnel together
To recap, here’s a simple funnel with three steps:
- A checkout page, complete with two-step checkout and an order bump
- An upsell offer
- A thank you page
Your funnel it set up. Let’s see how the funnel will work for visitors.
Working of the funnel
First, the visitors will land on your checkout landing page, where they’ll be prompted to enter their shipping information:

On the second step, they’ll see an order summary and choose their payment method/enter details. This is also where the order bump appears.

Once they place their order, they’ll see the next step in the funnel – the upsell offer:
They can either accept or reject the upsell offer. Then, they’ll see the last step in the funnel – the thank you page – which summarizes exactly what they’ve ordered.
That’s how you create different funnels with CartFlows. Quite interesting and we like it how simple it is for users to set up a sales funnel.
Now, let’s see what Offermative has in store for you.
Offermative features, setup…what do you get?
Offermative has an in-built intelligent system that generates high-converting offers for you automatically. So, all the features are related to offer creation.
Offermative features
High converting designs

The biggest pain point for any user is getting the right designs and Offermative completely eliminates that pain. Dozens of offer designs, pleasing to the eye, works well for any offer and converts visitors easily. Your audience would say – “WOW”!
Discount types
Fixed, percentage, sitewide, conditional, exclusive, cart discounts, … run all sorts of discounts.
Offer types
Upsells, cross-sells, order bumps, cart bumps, BOGO, related product recommendations, sitewide discounts…all the offer types you need to boost average order value.
Message types
Show offers via the most popular and widely used message types – messengers or slide-ins, header/footer bars, lightbox popups, inline messages, overlays, notification boxes.
You can also customize the message colors to suit your brand style.
Automatic coupons
Offermative auto creates coupons and applies on the product / cart automatically when the customer adds products to the cart.
Copywriting
Offermative creates headlines, offers text, CTA that resonate with your target audience’s pain points and nudges them with feasible solutions. You can also tweak the copy as per your requirements.
Offermative will auto-pull your products’ featured images and some good looking stock images to show in the offer campaigns.
Targeting rules
Better the rules, better the conversions. Offermative reviews your entire product catalog to select the products and pages that you can promote your offer on.
Hundreds of targeting rules to show your offer. Cart total, order total, product-based, category-based, user log-in status, user’s previous purchases, device-based…a lot to select from and tweak as required.
A/B split testing
Run multiple offer messages on the same page to see what performs better. That’s split testing for you.
Language support
Show offers in the language your audience prefer – English, Spanish, German, Italian, Japanese…currently supports twelves languages and more to be added soon.
Tracking and analytics
Identify your best and poor performing offers. Revenue earned, impressions, conversions and a lot more insights for each offer. Edit, extend, pause, schedule any offer campaign at any time.
Support for product types
Physical, digital, subscriptions, variations, bundles…run offers on different product types easily.
Compatible with other sales funnel plugins
Adheres to WooCommerce standards and works with other plugins that enhance the sales funnel. Will work with CartFlows as well.
Compatible with themes
Tested with popular themes. Offermative won’t mess up your WordPress theme, nor can your theme distort Offermative designs
Payment gateways
Compatible with all payment gateways that WooCommerce supports.
Offermative installation
Installation and login
Purchase the plugin and install it like any WordPress plugin and activate it. Now, follow the instructions in the plugin to set up your offer campaigns.
Login

After activating the plugin, you’ll be taken to the Marketing > Offermative page. A login screen will open up as a slide-in panel from right. Enter your email and password to login (Password will be automatically sent to the email you used to purchase Offermative).
Settings
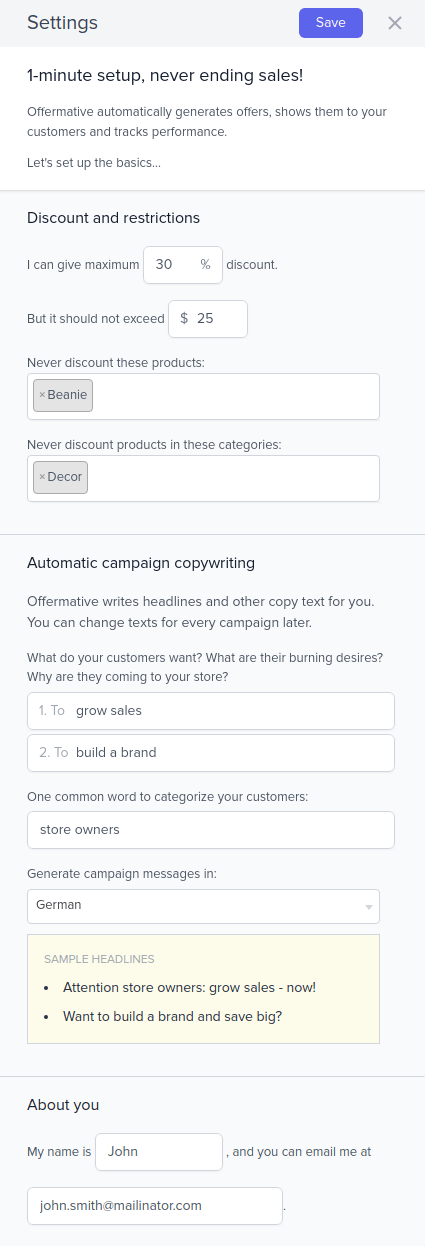
- After successful login, you will see a
Settingsscreen for initial configuration for automatic offer generation. - Enter the maximum percentage discount and amount discount you’d like to provide.
- Exclude some products or categories that you don’t want to discount.
- Tell Offermative about your target customers – category (students, music lovers) and two common desires they have.
- Choose a language you want to generate offer campaigns and show to your users.
- Save your Settings.
Generating, editing and publishing offer campaigns
Now this is where magic happens.
Anytime you click on the “Generate Offer Campaigns” button, Offermative plugin will automatically generate a set of unique offer campaigns for your WooCommerce site.
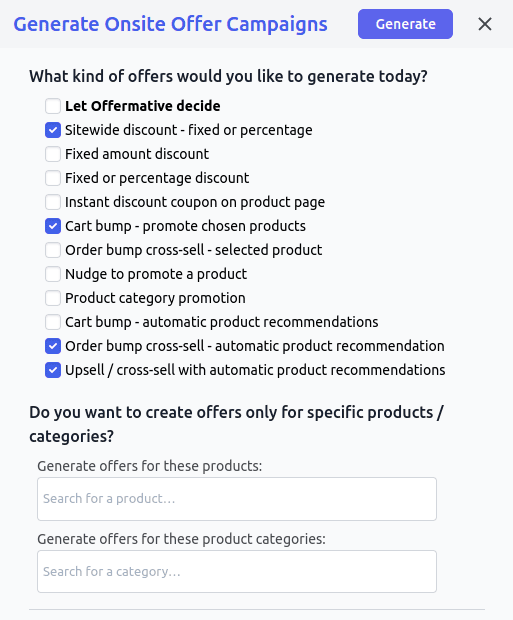
We recommend you choose the ‘Let Offermative decide’ option. You can also select multiple offers from the list. Sitewide discount, upsell, cross-sell, order bump, cart bump, and others.
Offermative auto-picks which products / categories to promote (excluding the ones in the settings), the targeting pages, rules as to whom to show the offer, offer copy and more.
You will see a preview of each offer campaign. You have full flexibility to edit the copy text, targeting rules, messsage colors and other details.
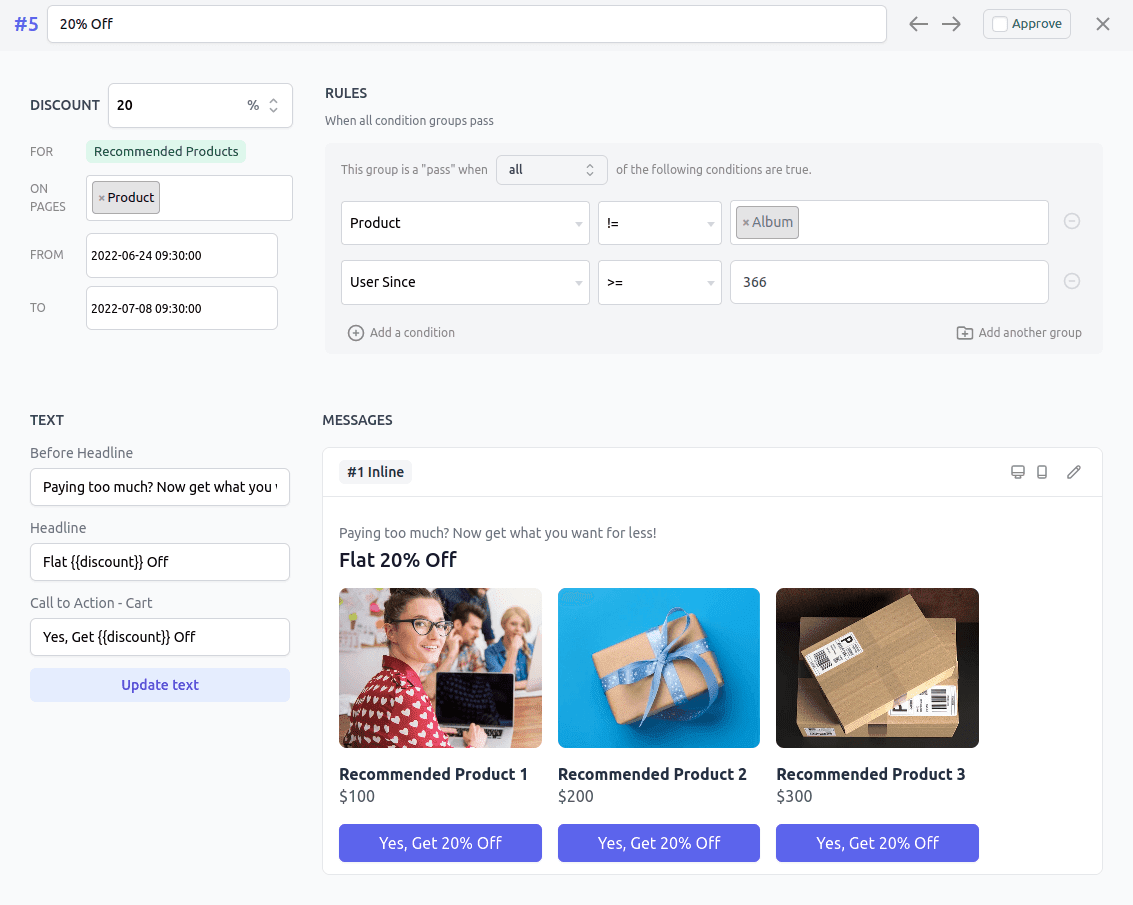
If you like a campaign, approve it. If not, move to the next one. Once finalized, click the Publish button. Your offers will go live at the set date and time.
Offer scheduling
All approved campaigns or offers will be live on your site based on the date and time you select.
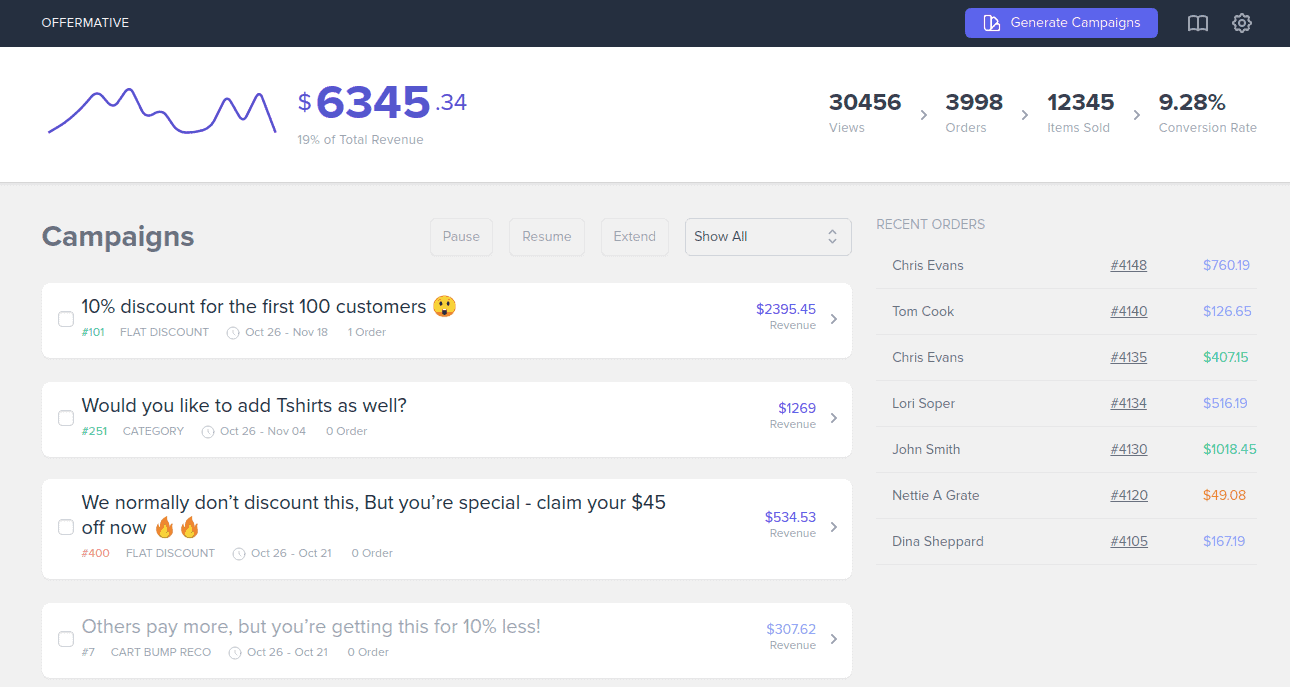
Based on the campaign tracking results, you can choose whether to extend or stop the campaigns using the dedicated dashboard.
Well, that’s almost zero effort involved. Simple, flexible, time-saver.
Pricing
CartFlows pricing
If you consider the Free plan, CartFlows doesn’t come with all the bells and whistles. One-click upsells, order bumps, 2-step checkout, split testing…all are in the pro version. You get some limited templates, cart abandonment and other things in the free version.
The Pro version will cost you $239 for a year and $999 for a lifetime license. Both of these plans provide you all the features and use on upto 30 websites.
Offermative pricing
Offermative offers you three annual plans, all with unlimited offer campaigns and all the features in all the three plans. The only catch is the number of websites you can use.
- Upto three sites – $49
- Upto ten sites – $99
- Unlimited websites – $199
You see, it’s quite flexible and affordable based on your needs.
And if you consider the RoI from the offers you will run, Offermative will cost you nothing.
I mean paying $49 and earning $499, $1999,$4999…you can do the math.
Apples to apples – Which is better?
Both Offermative and CartFlows, though different plugins, are sales funnel plugins and have the offers part in common.
With CartFlows, you get upsells, downsells, cross-sells, order bumps…you can target these offers on pages, select products to target. You also have some readymade templates for the offers.
While with Offermative, you get all the offer types and even more like BOGO, product recommendations, copywriting that converts, better and more targeting rules, better designs, more features related to offers and more automation.
What does CartFlows have that Offermative does not?
- List building and cart abandonment
- One-click upsells
- Checkout optimization features
What does Offermative have that Cartflows does not?
- AI-based offer creation
- Copywriting based on target audience
- Better designs and control
- More offer types, message types
- Ease-of-use, time-savings
- Dedicated for WooCommerce
Bottomline – Which one to buy?
If you want a straightforward and automated offer solution, that involves no learning curve and gets you sales on autopilot, without costing you almost nothing, go with Offermative.
If you want a solution that has list building, offers, checkout features…all stuffed in one, but still involves some learning curve, go with CartFlows.
Another suggestion – You can use both on your site. Use Offermative for getting sales via offers. Use Cartflows for better checkout optimization and reduce abandonment.
It’s a really powerful combo. Both Woo funnels plugins are valuable to users based on what they offer.
Source for CartFlows images – WPAstra.com