Generate Offer Campaigns
Choose offer types
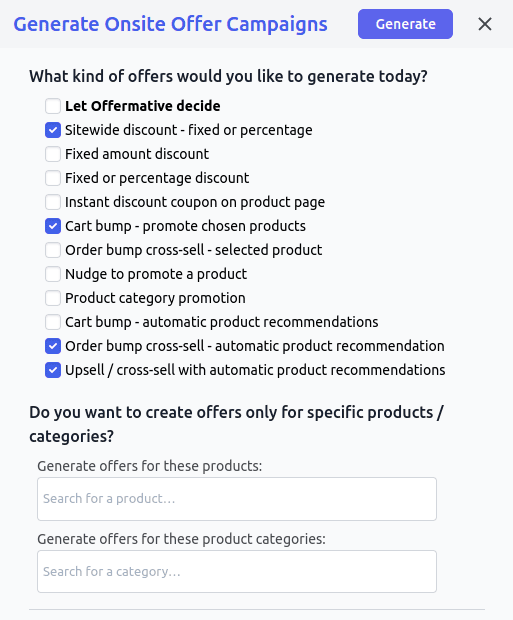
Once you save the Settings, you’ll see the Generate Offer Campaigns button. Click on it and it will give you options to choose from:
Let Offermative decideoption- Other offer types (you can choose multiple options)
Also, search and select the products or categories if you want to create offers only for those. Click on the Generate button.
Note – If nothing is specified in the restrictions here, then the campaigns would be generated based on the restrictions configured in the Settings.
Offermative will generate ten campaigns in one go each on the click of the “Generate Campaigns” button. Click the same button to generate more campaigns.
Let’s move to the discount, rules and other elements of the offer campaign.
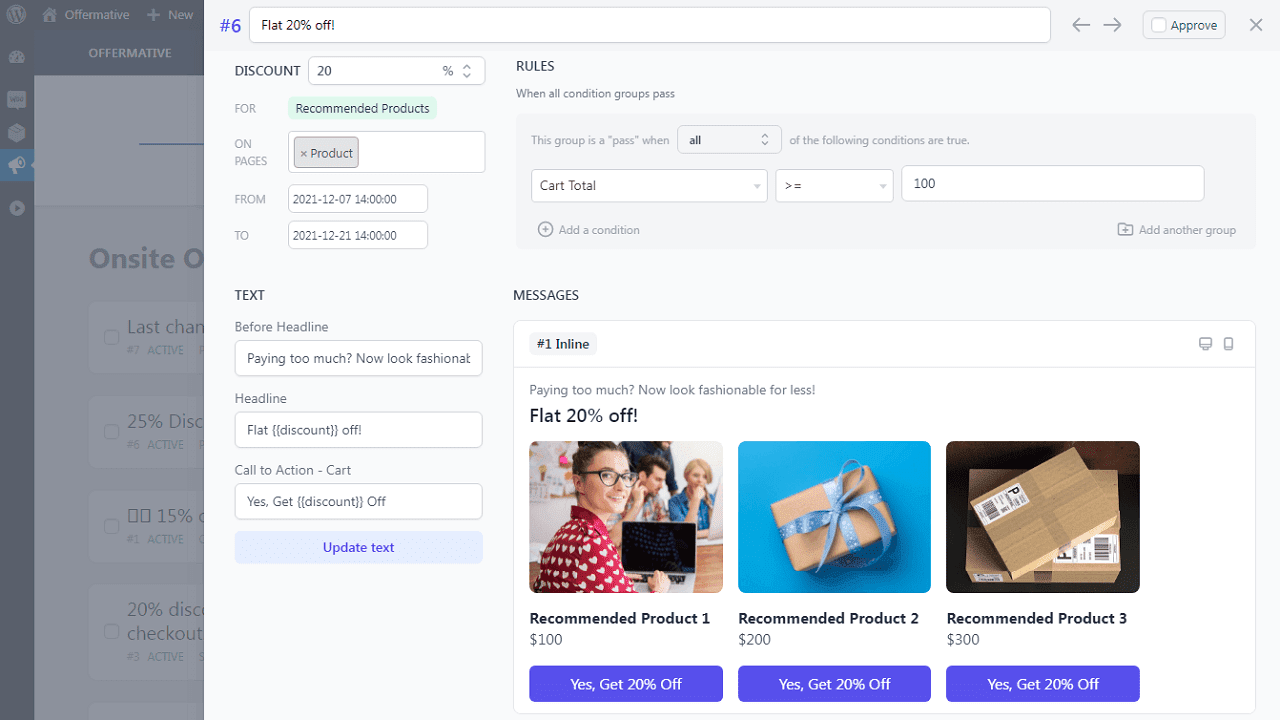
Campaign name
At the top of the campaign:
- The campaign title will be auto-generated. You can modify it as per your preference.
- Next to it, there are back and forth arrows. Use them to navigate through multiple offer campaigns.
- Approve – If you like a campaign, click the Approve button.
- Publish – Hit the Publish campaign(s) button only when you approve all the campaigns you want to make live.
- Close – The Generated Campaigns dialog will close on the click of the button. It will discard all your campaigns along with any changes done by you and the same changes will be lost. Click again on the ‘Generate Campaigns’ button to generate new campaigns again.
Discount
On the top-left of the campaign:
- Enter the percentage or flat discount
- FOR – Select the products or categories you want to show the offer. If the campaign shows
Recommended Products, it will automatically display the recommended products based on different parameters. - ON PAGES – Choose the pages you want to show the offer.
- NOT ON PAGES – Choose the pages you don’t want to show the offer.
- Choose the date and time you want the particular offer campaign to go live/run for a time period.
Note – Except for discount and date, you may or may not find the above options in all the campaigns.
Rules
On the right side of the Discount section:
If there are multiple rule groups, the offer will be shown only when all the condition rule groups are satisfied. The same applies within a group also.
- Click on ‘Add a condition‘ to add rules within a group.
- Click on ‘Add another group‘ to create another rule group.
- You can also delete a group and condition by clicking on the ‘Remove this group‘ & ‘Remove condition‘ options respectively.
You can create hundreds of rules to show targeted offers. Rules are based on cart total, products, categories, customer purchase history, user screen type, customer LTV, etc.
Note – You can edit the pre-generated rules for the campaigns.
Copywriting and message types
Below the Discount and Rules section:
For each campaign, you‘ll see an offer copy generated on the left – before headline, headline, body, multiple CTA options. You can edit the text for all of these. Make edits and click on the Update text button. All your changes will be reflected in the message preview on the right.
You can select whether to change the copy for all message types or individual message types. Click on the ‘Update text’ button once done.
Offermative will generate various message types to show the offers – popup, slide-ins, header/footer bars and others.
For each message type, you can click on the Pencil icon to customize it for colors, fonts, text size, buttons and other CSS elements.
Delete the messages you don’t want to show by clicking the Delete icon. You can also click on the Mobile icon to see how the offer campaign will look on mobile.
Approve and publish campaigns
Use the back and forth arrows on the top to navigate through multiple campaigns. If you like any campaign, tick the Approve checkbox.
If not, you can edit rules, copy, discounts and others as mentioned and then tick the ‘Approve’ checkbox. The changes are preserved when you modify a campaign and navigate to another campaign. Do it for all the campaigns you want to make live. Once all is finalized, click the Publish button.
Note – In case of multiple offers selected on the same page, Offermative will randomly pick from the offers to show to your audience. It will internally do a split test to pick and show the best one.
Any time you want to generate offers, repeat the procedure mentioned above. You can tweak campaigns any time you want.